Weights
| Item | Origin | Weight(lbs) |
|---|---|---|
| Starter Motor | 4agze | 8.5 |
| E58 transmission w/motor mount brackets, throw out bearing and shift fork only. No octopus or other mounting brackets. No clutch slave cylinder | 4agze | 110.5 |
| C52 transmission (non LSD) w/motor mount brackets, throw out bearing and shift fork only. No octopus or other mounting brackets. With slave cylinder | 4age | 84.0 |
| C60? transmission (with LSD) w/motor mount brackets, throw out bearing and shift fork only. No octopus or other mounting brackets. With slave cylinder | 1zz | 96.6 |
| Exhaust manifold | 4agze | 15.0 |
| Exhaust manifold | 4age | 15.0 |
| Flywheel | ?* | 13.0 |
| Flywheel | Fidanza | 9.5 |
| Front brake disc | 1988 Corolla GTS | 8.5 |
| Front brake disc | 1992 Celica GTS | 15.0 |
| Wheel -stock alloy 185/60R-14, rim and tire, Dunlop | 1988 Corolla GTS | 35.0 |
| Wheel -SSR 205/45R-16, rim and tire, Yokahama | Tirerack | 33.5 |
| Front brake caliper | 1988 Corolla GTS | 6.3 |
| Front brake caliper | 1992 Celica GTS | 7.3 |
| Engine w/ transmission, starter, alternator, a/c compressor, water pump, supercharger, intake and exhaust manifolds, wiring, octopus, power steering pump, clutch, slave cylinder, pass. side motor mount, basically everything except drive shafts and intercooler. | 4agze | 462.0** |
| Engine w/ transmission, starter, alternator, a/c compressor, water pump, intake and exhaust manifolds, wiring, power steering pump, clutch, slave cylinder, basically everything except drive shafts, octopus and pass. motor mount. | 4age | 382.0** |
| Engine w/ transmission, starter, alternator, a/c compressor, water pump, intake and exhaust manifolds, wiring, power steering pump, clutch, slave cylinder, basically everything except drive shafts. | 1mzfe | 522.0** |
| 2zz-ge engine with starter, alternator, intake, exhaust, H20 pump | 2001 Toyota Celica | 239.0 |
| LSD | 4agze | 17.5 |
| Muffler (stock) | 1999 Solara V6 | 21.0 |
| Muffler (stock) | 1988 Corolla GTS | 8.0 |
| 1zzfe engine with starter, alternator, intake, exhaust, H20 pump*** | 2003 MR2 Spyder | 239 |
| SC12 supercharger | 4agze | 23.0 |
| My car with 4agze (no fuel) | 4agze modified 1988 Corolla GTS | 2655 |
| Generic eBay intercooler I was using | eBay | 8.0 |
| TRD supercharger (includes all parts and box and documentation) | 1999-2002 1mzfe, 5 speed | 45.0 |
| Front bumper | 1988 Corolla GTS | 21.0 |
| E153 Transmission (no starter, mounts or shifter linkage) | 2002 Solara, 1mzfe | 117.0 |
| Stock clutch and pressure plate | 2002 Solara, 1mzfe | 13.5 |
| Stock flywheel | 2002 Solara, 1mzfe | 17.0 |
| Fidanza flwheel | 2002 Solara, 1mzfe | 9.0 |
| Exedy clutch and pressure plate | 2002 Solara, 1mzfe | 13.0 |
| Wiring (all, including all fuse boxes, clips and grommets) | 1988 Corolla GTS | 20.0 |
| Wiring (all, including all fuse boxes, clips and grommets, even the sunroof motor) | 2002 Solara, 1mzfe | 48.0 |
| Hood | 1988 Corolla GTS | 43.0 |
| * Because Toysport sent me the wrong clutch and pressure plate, I don't really know what this goes to. I believe it mates to a USDM 4agze in an AW11 MR2. | ||
| ** I believe this is very accurate. However, though I used a level to balance the engine and counterweight, an ounce or two more on the counterweight would probably have still fallen into the bubble on the level and all weight added to the long arm of the balance beam is worth nearly 10x as much and because a motor mount can add a whole pound or two, I do not want to put a super precise number on this. This is good for my configuration and tells me pretty much what to expect as far as weight goes. | ||
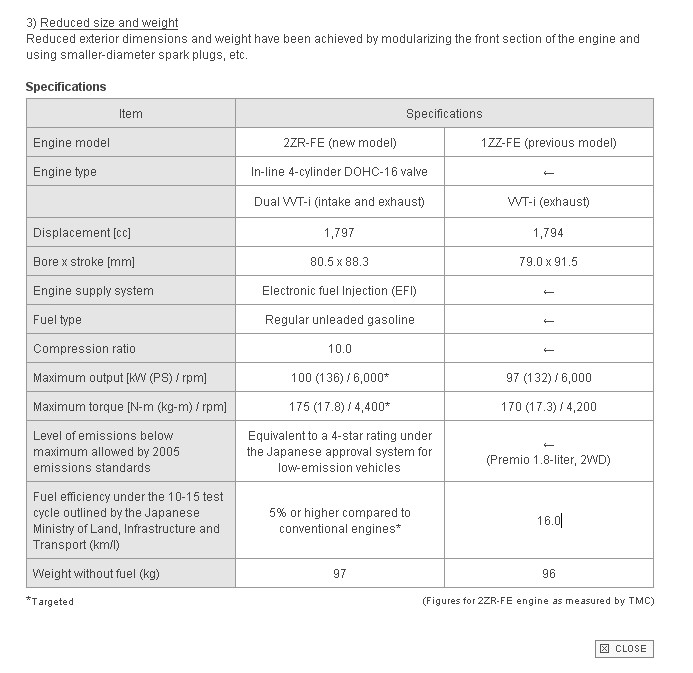
| ***Weighed! According to the Toyota document on page W3 the engine weighs 96 Kg without fuel, whatever that means. | ||
The list is of weights that I have taken more or less randomly whenever I have a part in my hand that I can weigh. They are not super accurate. I used two methods to make these measurements. The first is my bathroom scale which is digital and has an increment of only 0.2 lbs. Who knows what it's accuracy is supposed to be. So if you are interested in knowing to the last ounce how much these components weigh, then you'll have to go elsewhere to find them. These weights are good enough for me.
In some of the pictures you will see the component directly on the scale with a reading. It is important to note that any scale is most accurate toward the middle of its range. The proper way to measure something that is toward the low end of the scale is to put a heavier object on the scale (myself in this instance) and take a measurement, then to put both objects on the scale and find the difference. I actually did this and they came out about the same. This is probably because of the 0.5 lb discrete measurement increment. In any case, having the component on the scale alone, lends for a better picture. The second method I used to measure things was the balance scale that I built. The details of it's construction, as well as theory on how it works can be found on here.
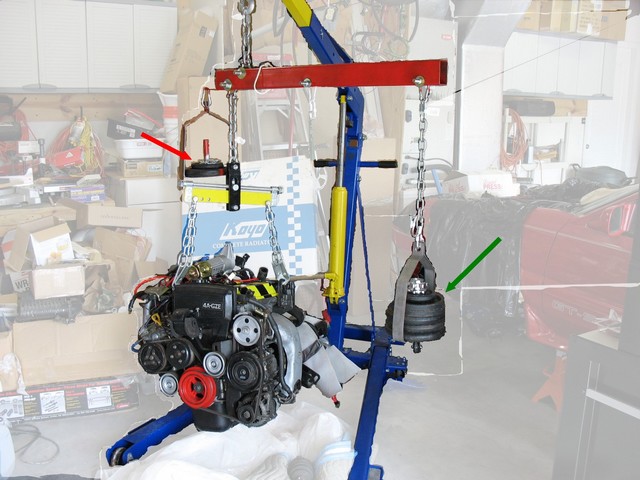
The engine is being weighed with my balance scale. It was difficult to pull things out of the background, so I altered the picture. I don't like the way it came out, but at least you can see things. The red arrow points to the calibration weight and the green arrow points to the weight required to balance the engine, the counterweight.

Here is a better shot of the engine configuration as it was weighed. The starter is on the top, since I hadn't installed it yet.
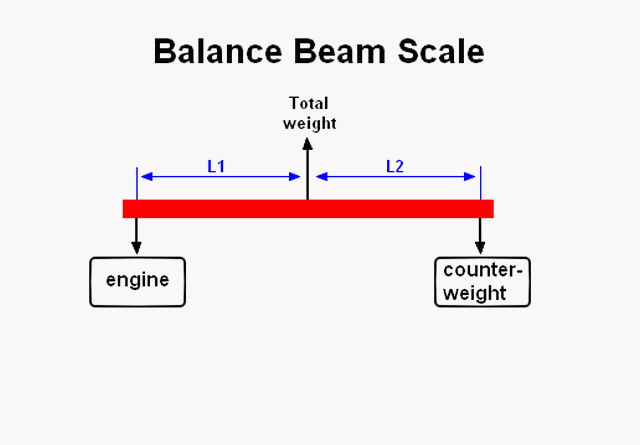
Normally balance beam scales are made with the fulcrum in the middle (L2 = L1) so that what is on the left is equal to a known value on the right when the beam is level. However, I did not want to have to load up 400 lbs of stuff on the right side of my scale. So I changed the fulcrum to create a factor of 10 difference.

So by making length L2 = (L1 x 10) I should be able to put only 40 lbs of weight on the right side. That is a value that is a lot easier to handle and exercise weights fit the bill nicely.
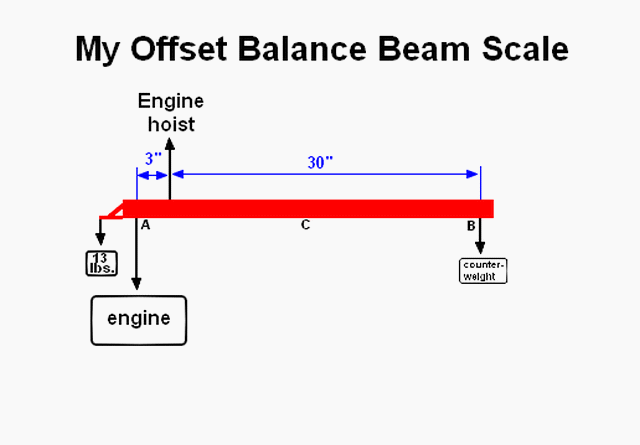
This is nice in theory, but I forgot one simple thing. In a balance beam with the fulcrum at the middle, the weight of the beam is not important, only its strength. But when the balance beam is offset, the weight of the beam on the right is much greater than that on the left and this contributes to the measurement if it is not calibrated out. So I had to add a calibration weight to make the scale balance with no load or counterweight. Here is my design.
Important notes
If you want to make such a scale there are many things to consider. First, consider the cost. I spent about $70 making this rig. On Ebay I found scales capable of large weights going for hundreds of dollars. But occasionally I found one for about $100.00. At the time I did not want to pay that much for a scale, so I set out to build mine. However, mine is cumbersome to use and has to be constructed. Another $30.00 is not such a bad deal for the convenience. This design is best for people who have a lot of raw materials just laying around and maybe want the fun of building their own scales.
Two, consider safety. The beam and all of the components must be capable of handling the weights involved plus a generous safety margin. I actually calculated the static bending moment of the beam I used and found that it was about 10 times as strong as necessary for my scale, which I rate at 1000 lbs. Alternately, you could say I just used the same material that was used in my engine hoist. Also, the carabiners I used were capable of handling way more than I needed. This is one of the reasons why it was so expensive to build. Also, don't remove the counterweights until you have lowered everything to the floor. If you suddenly remove all of the weight from the counterweight end, the engine will drop to the floor and the right side of the beam will fly up and hit you in the face. No, I'm not speaking from experience. I actually figured that out before getting whacked!
C, don't worry too much about getting the dimensions perfect. In the end you are going to have to calibrate it out anyway and it is not likely you will get a perfect 10:1 ratio. And it really doesn't matter if you multiply by 10 or 9.9, does it. The calculator won't hold it against you. I swear.
Finally, when measuring, it is important to make sure the beam balances with no weight at points A or B, by adjusting the calibration weight. The calibration weight has no other purpose other than to zero out the scale. You do not need to know how much it weighs. Once you have leveled the empty scale, add your item, an engine in this case, at point A and then enough weight at point B to make the beam level again. Use common sense. If you lower everything and add the engine and then you start to raise everything, the long end of the beam will begin to rise and maybe hit something. It's easier to guess how much the engine weighs and put approximately 10 times that on the other end and then jack it up. Once you get it all in the air, then you can fine tune by adding or subtracting counterweight. When you have it level lower it all down and weigh the counterweight. I took mine to a UPS store where they are required to have their scales calibrated by law. They were not busy and they were more than happy to let me put my weights on there. It only takes a second. Of course, you could always use the bathroom scale.
Remember to zero out anything you don't want to measure. For instance, if you need a hook (or in my case a load leveler) to hook onto the engine, but you don't want to add that weight to your measurement, put it on the scale and zero it BEFORE you add the engine.
Lastly, the longer your lever arm, the less weight you need, but also the less accurate it will be. That is to say, the accuracy is technically the same no matter what the lever arm. But because it takes only a small amount of weight over a long lever arm to make a big difference, you need to measure that weight more accurately. So on a normal balance beam with the fulcrum in the middle, if you balance it, then weigh your counterweight inaccurately such that you are off by 5 lbs, then your result will be off by 5 lbs. But with the 10:1 offset balance beam scale, if you weigh your counterweights inaccurately and you are off by 5 lbs, your result will be off by 50lbs.
Something you can do to mitigate this, is to put another weigh point closer in, point C, and roughly balance the engine, then use the longer arm at point B to fine tune. With the weight at point B so small, you can weigh it on a parcel scale and get more accurate weight measurement. Of course, you would then need to calibrate the scale twice before starting. Once to get a ratio at point C and once for point B. I actually did this, but ultimately opted to use point B only.

To decide what materials to use and how to assemble them, I looked at my engine hoist. The arm that supports the load is 3" x 2" rectangular steel tube with an 1/8" wall. As I said, I actually calculated what kind of bending moment it could take and decided that this was definitely sufficient. I was originally going to use eye bolts in the various locations to use as attachment points. This turned out to be a bad idea. Eye bolts are not capable of handling that kind of load without getting massive and very expensive. A bolt all the way through the beam, putting the load in shear makes it a lot easier to find hardware strong enough to handle the loads. Here is a blurry picture that still shows how it mounts.
So as you can see in the foreground, a slot cut into the top of the beam allows a shackle to pass into the center and the bolt is fed all the way through the beam and the shackle. It is important to note that the shackle at the fulcrum must be capable of supporting everything; the load, the beam, the calibration weight, the counterweight and any associated hardware, plus a nice safety margin of 2x or even 3x. The same goes for the bolt that passes through the shackle and the cross section of the beam after all the holes are put into it. Fortunately, this means that the bolts that support the counterweight need only hold the counterweight. In my case the counterweight will never exceed 100 lbs.
I spent about $45.00 on hardware and about $25.00 on the beam. Here are the parts I used:
Remember, just because a bolt is big doesn't mean it's strong. Make sure you buy all the right hardware!
| Parts |
|---|
| 2 shackles |
| 2 carabiners |
| 4 U-links |
| 2 expensive strong nut/bolt combos |
| 2 less expensive less strong nut/bolt combos |
| 2 feet of chain |
| 1 3" x 2" rectangular steel tube with 1/8" wall thickness, ~36" long. |
The following document is from Toyota and it lists the weight for the 1zzfe engine in the Toyota MR2 Spyder, but it oddly quotes the weight without fuel. I can only assume this means without the fuel injection system. Due to its light weight I also assume no extra components such as starters and alternators are included either.